
What you’ll need:
- Cricut maker 3
- Permanent Vinyl
- Scissors
- Weeding tools
- Squeegee
- Transfer tape
- A piece of wood you want to use for your sign (Michaels, Hobby Lobby, or if you are good with your hands, Home Depot)
- The generated QR code you want to use (go to https://qrcodecreator.com/ to create a QR code)
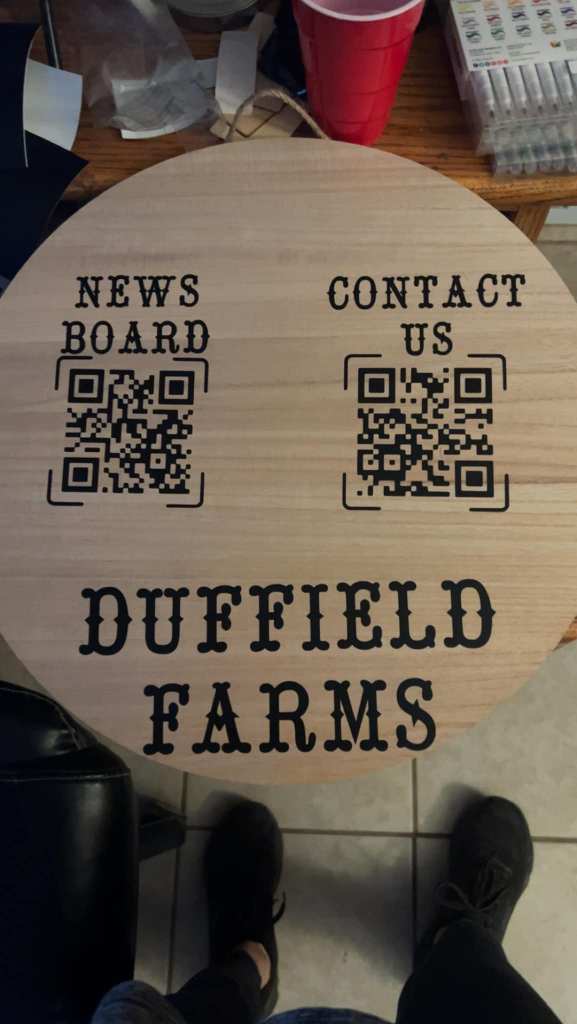
This is the first sign I ever made and is what I am basing my instructions on:
Step One: Open Cricut Design Space
- Upload your QR code using PNG format.
- Click the option to automatically remove any background of the QR code.
- Next, click the option to have multiple layers.
- The options to pick next will be clipart and the output style to be stacked. Make sure it’s set to two layers: black and white.
- Then, you are back in Design Space. Adjust the sizing of the QR code to your desired size, then start cutting.
Step Two: Weeding and Transfer
- When the cutting is finished, first pull off the majority of the vinyl that you need to weed, then start weeding the QR code itself.
- Scan the QR code to make sure it works.
- Cut the size of transfer tape you need and put it over your QR code that you just finished weeding.
- Use your little squeegee to ensure the vinyl is stuck on the transfer tape well.
- Carefully pull the transfer tape off, making sure the vinyl transfers to the tape. If you are having a hard time, carefully pull the vinyl off of the transfer tape.
Step Three: Applying to Wood
- Get your piece of wood that you want to use as a sign and pick the placement you want to put the QR code on.
- Stick the QR code on the transfer tape onto the wood, sticky side down.
- Use the squeegee again over it for a good minute or two to make sure it really sticks and transfers onto the wood.
