
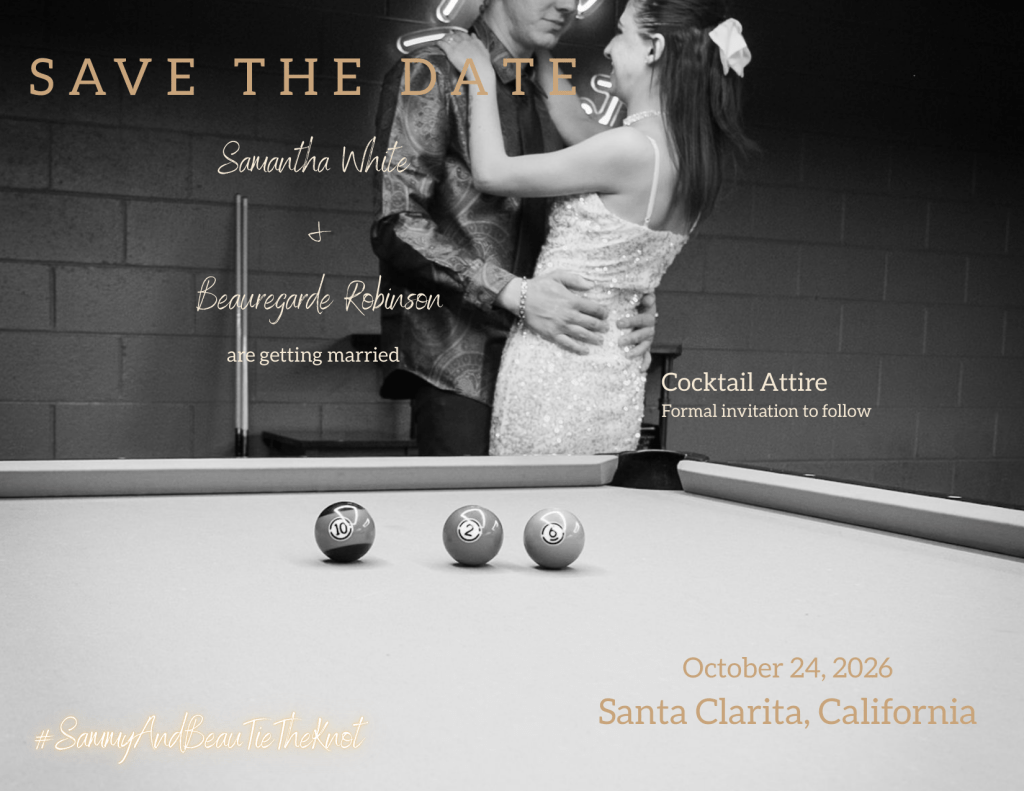
Custom wedding Save the Date designed and printed using Canva. #WeddingPlanning #SaveTheDate #DIYWedding #BrideToBe #SammyAndBeauTieTheKnot
How to Design and Print DIY Wedding Save the Dates with Canva (Step-by-Step Guide for Brides)
When it came time to create our wedding Save the Dates, I wanted something that looked professional, meaningful, and personal—without spending a fortune on custom stationery. I ended up designing and printing everything through Canva, and it turned out to be one of the easiest and most enjoyable parts of the planning process.
The photos featured on our Save the Dates were taken during a professional collaboration with The Break Room, which is actually where Beau and I had our first date. That made the photos even more meaningful because they weren’t just engagement pictures—they represented the place where our relationship really began. Working with a professional photographer made a huge difference in the final look of the Save the Date cards and gave the design a polished, high-end feel.
After receiving the photos, I uploaded them into Canva and designed the Save the Date card directly within their platform. Canva makes designing incredibly simple because you can either start with a template or build your design from scratch. I customized the fonts, layout, colors, and spacing so everything matched the aesthetic of our wedding and the overall branding style I love.
Once the design was finished, I ordered the prints directly through Canva Print instead of downloading the file and printing somewhere else. This made the process seamless because Canva automatically formats everything correctly for professional printing, including margins and bleed areas. That removes a lot of the guesswork that can happen when preparing designs for print.
One thing I really appreciate about printing through Canva is that for every print order placed, Canva plants a tree as part of their sustainability initiative. Knowing that something as simple as wedding stationery can also support environmental efforts made me feel even better about ordering through them.
Another great thing is that Canva is based in Australia, yet their printing and fulfillment process is incredibly efficient. Standard shipping is free, unless you choose to upgrade it. Personally, I never upgrade the shipping because even with the free option my print orders usually arrive within about a week, which is honestly impressive for custom printed wedding stationery.
Between the easy design tools, professional printing quality, eco-friendly initiative, and fast free shipping, Canva ended up being the perfect solution for creating our Save the Dates.
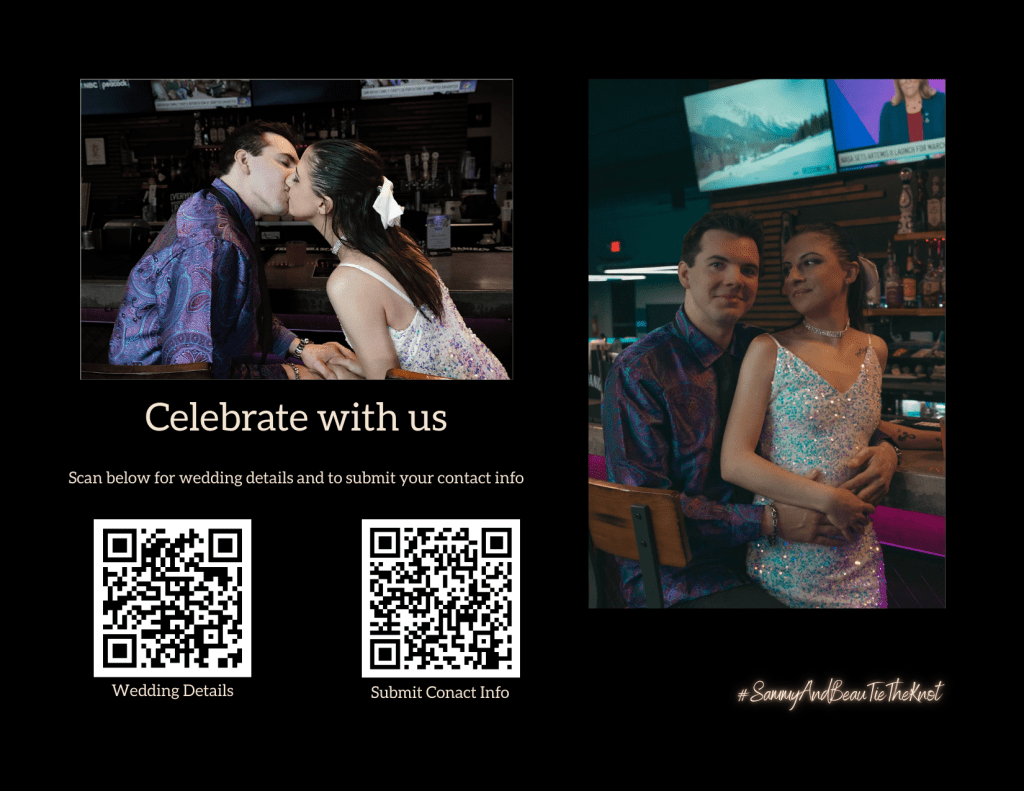
Adding QR Codes to My Save the Dates
One feature I absolutely loved using during the design process was Canva’s built-in QR code generator.
Canva actually has a QR code app built directly into the platform, which allows you to generate QR codes instantly and place them right into your design. It worked beautifully and made adding interactive elements to the Save the Date incredibly easy.
I created two different QR codes for my Save the Dates:
1. QR Code for Our Wedding Website
This QR code links directly to our wedding website where guests can find important information such as event details, updates, and future announcements.
2. QR Code for Guests to Submit Their Contact Information
The second QR code allows guests to easily submit their contact information so we can collect mailing addresses and keep our guest list organized.
Instead of guests having to type in long URLs or text us their information, they can simply scan the code with their phone camera and be taken directly to the page. It makes everything faster, more organized, and very modern.
Adding QR codes is also great because it keeps the Save the Date itself clean and minimal, while still giving guests quick access to important information.
Why We Created a Unique Wedding Hashtag
Another detail that was important to me while planning our wedding was creating a unique wedding hashtag. Wedding hashtags are a great way for guests to tag photos and videos from your engagement, wedding events, and the big day itself so everything can be found in one place.
For our wedding, I chose #SammyAndBeauTieTheKnot.
I made sure to pick something so unique that if you search the hashtag on Instagram, you will literally only find photos and videos related to our engagement and wedding journey. That means every memory our friends and family share online will automatically be organized under one searchable tag.
Choosing a unique hashtag is important because many common wedding hashtags are already used thousands of times. When you create something original, it becomes like a digital scrapbook where all the moments from your wedding experience live together online.
Tips for Brides Designing Their Own Save the Dates
If you’re thinking about designing your own Save the Dates, here are a few tips that helped make the process easier:
1. Use Professional Photos if Possible
Even if you’re designing the card yourself, professional photos instantly elevate the design. Good lighting, composition, and editing make a huge difference in the final look.
2. Choose Fonts That Are Beautiful but Readable
Script fonts are gorgeous, but pairing them with a simple clean font ensures guests can clearly read the important information.
3. Keep the Information Simple
A Save the Date only needs the essentials:
- Your names
- The wedding date
- The city or location
- A note that a formal invitation will follow
4. Use a Wedding Website to Collect Guest Information
One of the easiest ways to gather guest contact information is by using The Knot wedding website tools. Guests can submit their mailing addresses and contact details through your wedding website, which keeps everything organized in one place.
5. Order a Small Test Batch First
Before committing to a large order, consider ordering a small set so you can see the colors and print quality in person.
6. Send Them Early
Most couples send Save the Dates 6–12 months before the wedding, especially if guests may need to travel.
Designing my own Save the Dates allowed me to combine meaningful photos, thoughtful design, and a personal touch while keeping the process simple and affordable. Seeing them printed and ready to be mailed was also one of the first moments where the wedding started to feel real.
For anyone planning a wedding and considering the DIY route for stationery, Canva is an incredible tool that makes the entire process approachable, beautiful, and surprisingly stress-free.
